Expanding one’s wings – The use of Irix Edge grey filters in landscape photography
Ask yourself this question. How did you begin your adventure with photography?
Depending on ones’ age, those adventures probably began with “film”, which was either in the form of a compact camera or by taking a quick snapshot with a mobile phone. But these items were only tools that helped us to reflect the time and technology of the times in which we lived, enabling us to record the moment. The desire to consolidate the moment is often guided by the uncertainty of our memories or the need to share our emotions with others. Alternatively, we can go a step further and not only capture the moment, but also express it in a form that seems to us to be the most attractive: that is, going from the time documented to the situation to how we want to express artistically what we see.
The subject of expressing yourself with the aid of a camera is extremely interesting, because each of us has their own individual sense of aesthetics on the basis of which we try to find our own path in the world of photography. But before we can build up a style that will distinguish our work from other photographers, some considerable time will have to pass, along with the many places and people that we need to get to know.
It was probably the pioneer of street photography, Henri Cartier-Bresson, who most accurately sums it all up:
Your first 10,000 photographs are your worst.
Of course, this is not synonymous with switching the camera into high speed mode in order to achieve those 10,000 photographs as quickly as possible. We have to remember that analogue photography reigned when Henri made his quote, so each photo had a meaning –and a real cost. I believe the above quotation should be there to encourage every individual to use their first 10,000 photos to learn all about photography; to discover the art from the inside out, and through which we can consciously choose our photographic specialization.
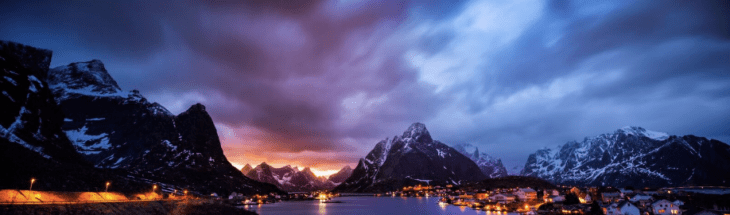
What you, the beginner, can start with is landscape photography. Because of its nature, it allows slow work, with the user having to focus on every parameter of the photo: the sensitivity, aperture, focal length, and time.
To be able to enjoy the full dynamic range and low noise we should always have with us the true friend of each photographer: a tripod. It must be stable, durable and as light as possible; modern materials allow us to achieve such a compromise (carbon fibre such as, for example, Genesis C3 Carbon). Thanks to this we can ask for the lowest nominal ISO value (depending on the camera, this value will vary from 50 to 200).
The aperture parameter is also important, because it directly influences what is happening in the frame – it decides what remains sharp and what remains hidden in the beautiful bokeh. It is also worth checking where is the “golden centre” of our lens, that is, deciding and using which aperture values will generate the sharpest picture within the frame (usually an aperture between f/5.6 – f/8.0, depending on the lens, although there are exceptions). However, the use of these aperture parameters limits our ability to modify this particular parameter and thus work at different times.
Now as regards the focal length, well, there are no unambiguous answers. In landscape photography it has always been assumed we use extreme focal lengths in order to achieve photos with “this thing” – that is, the ultra-wide-angle or telephoto. The focal length (or rather the angle of view they generate) directly determines the perspective with which we will have to work: with wide-angle lenses, this will be stretched, and the object in the foreground will appear significantly larger and closer than on subsequent ideas. Telephoto lenses are characterized by their compression of the perspective in which the photo seems flatter (and there is nothing negative about this), and the objects on further plans seem to be closer.
So there is no universal answer as to which is “better” – our choice determines our work and the effect we want to achieve.
But we do have one remaining parameter – time.
For us as individuals, time is linear. It flows and we can do nothing about it.
But time is subjective for the camera. We can shorten it by freezing the movement or lengthen it, thus extending out the average progression of objects that are moving in the frame.
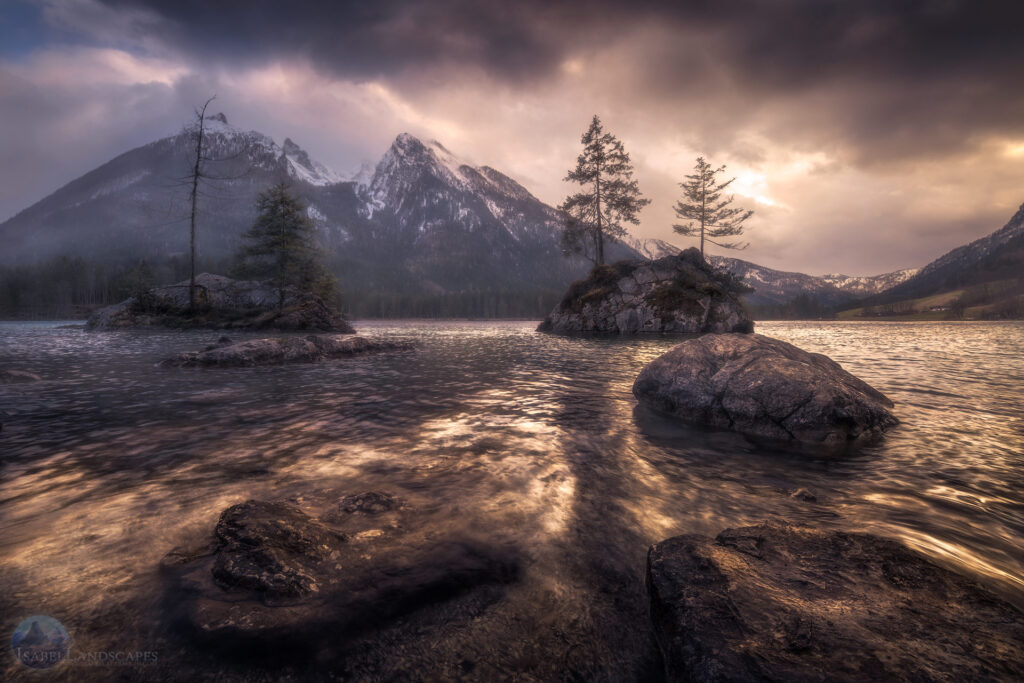
Now we inevitably come to the heart of the topic being discussed: the possibility of making creative use of grey filters in the landscape.
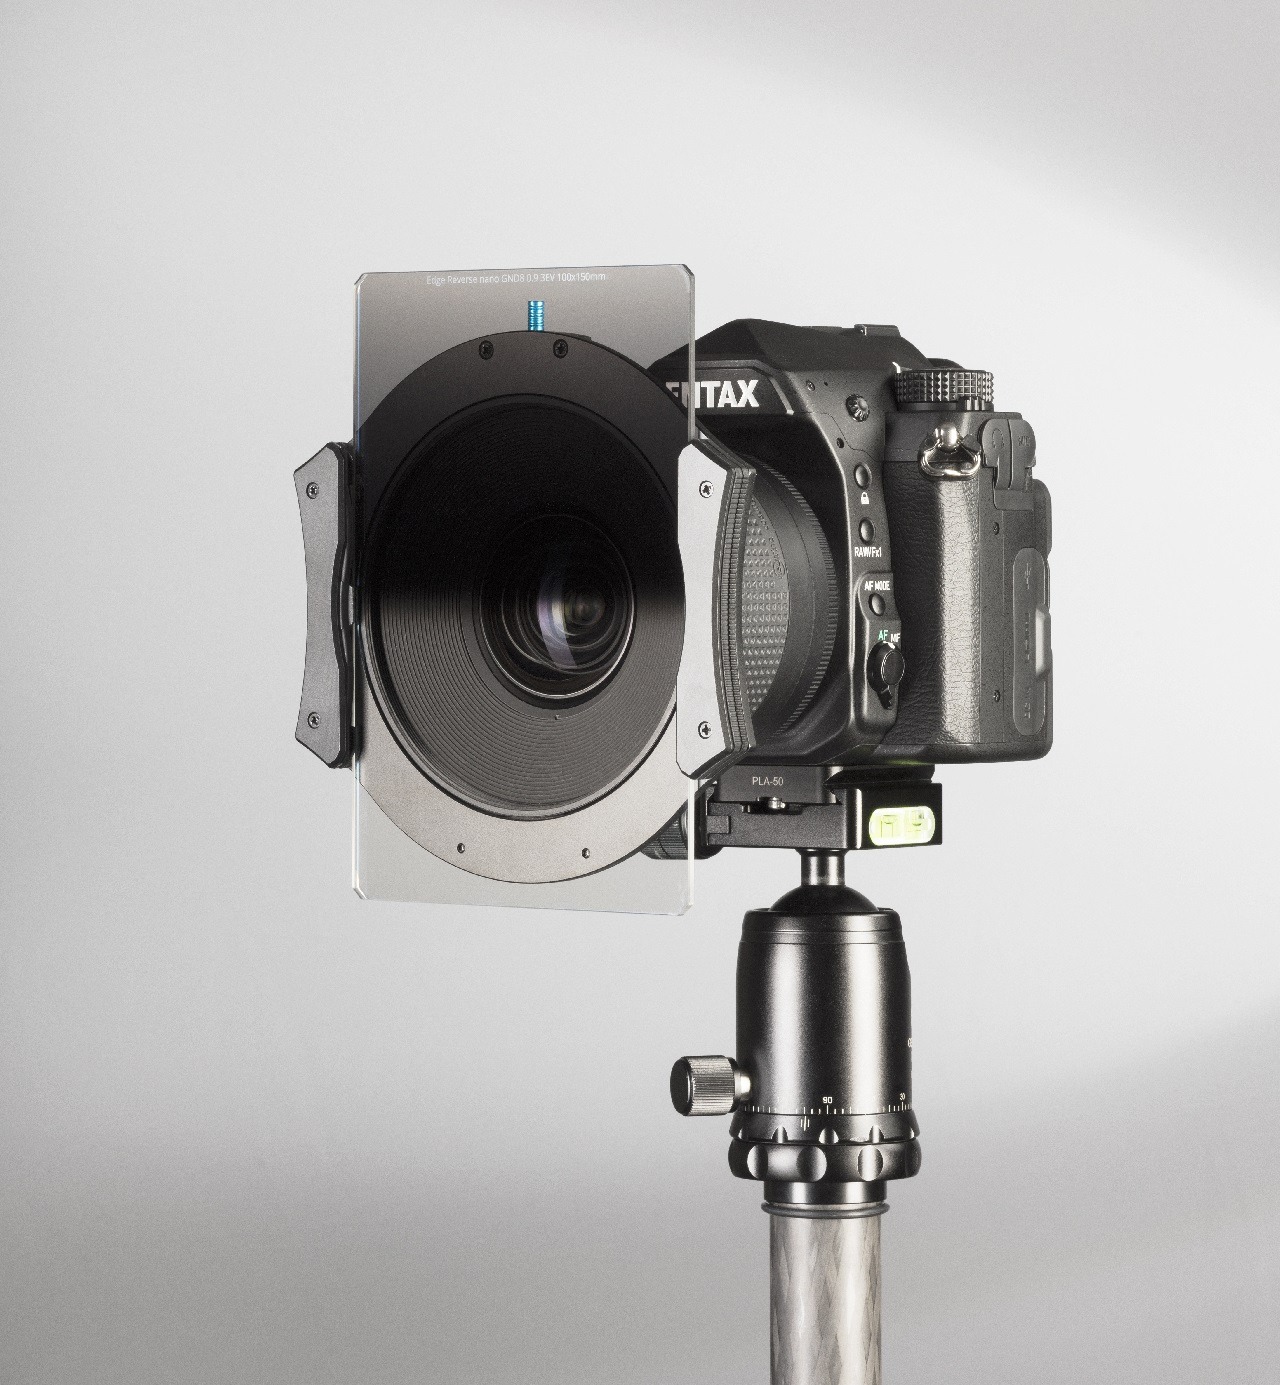
Let’s start with the grey filter itself. A good quality grey filter is a plate of optical glass, and coated with a special coating which is responsible for reducing the amount of light transmitted through its surface, while not affecting the colour of the photo in a noticeable way. Then these filters can be divided into two main species: round and square. Round filters, as the name suggests, are round, and their assembly takes place by means of a threaded ring placed on their frame. The advantage of such a solution is intuitiveness, fast assembly and tightness. Square filters are square shaped filters (full grey) and rectangles (half filters); mounting on the lens is possible thanks to a dedicated holder.
There is one simple rule as regards half filters – they are irreplaceable in those situations where we want to overcome those vast differences in exposure of the frame – between the light and dark parts – so that the displayed histogram does not touch any of the edges (this will prevent underexposure or burning of the image). Whereas grey filters are full, they are supposed to create a characteristic effect – that is, they blur the motion by limiting the amount of light falling onto the camera sensor – although they can also be used in a portrait in those situations where we want to enjoy a wide open aperture (for example, f/1.8) on a sunny day, and our camera doesn’t allow the faster shutter speed.
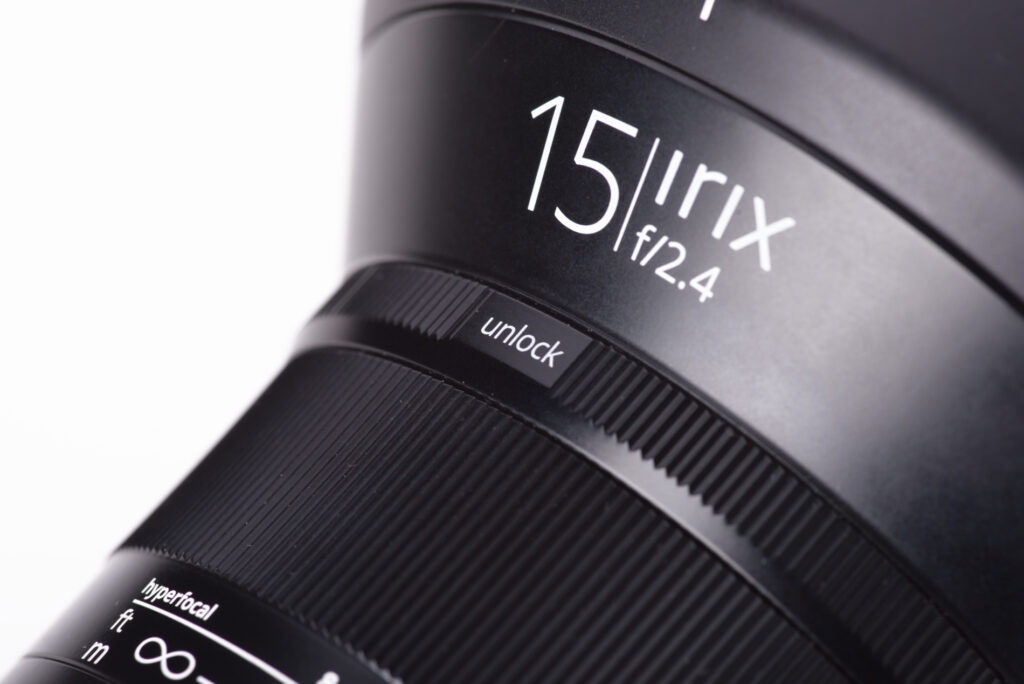
Below, I will try to familiarize myself with the characteristics of grey filters, specifying their type and application depending on the scene being photographed, and with the use of Irix Edge filters as an example.
Irix Edge 100x150mm Gradual Filters

In scenes where there is a very noticable difference between the light and dark parts, we may have a problem with recording information simultaneously in the light or dark parts of the image, due to the technical limitations of the camera sensors (or photosensitive materials). Now professional full-frame digital cameras (35mm) allow you to record a scene within which there is a difference in light intensity in the order of 15 EV (for ISO 100), but even this is sometimes not enough. Therefore, we must find ways to register more information in light and shadow than those offered by the camera itself.

Those problems associated with recording a technically difficult scene may be particularly troublesome to those holders of older photographic equipment that do not have enough in the way of advanced sensors to meet such conditions. The use of square filters is a simple way to breathe a second life into old cameras (both digital and analog); while they are a few years behind, they still enjoy a great reputation. Whether this is due to the nature of the service they provide, the colours generated by the camera, or it’s simply sentimentality for equipment that has been with us for some considerable time, we know and understand these pieces of kit perfectly and we don’t want to exchange them with anything else.
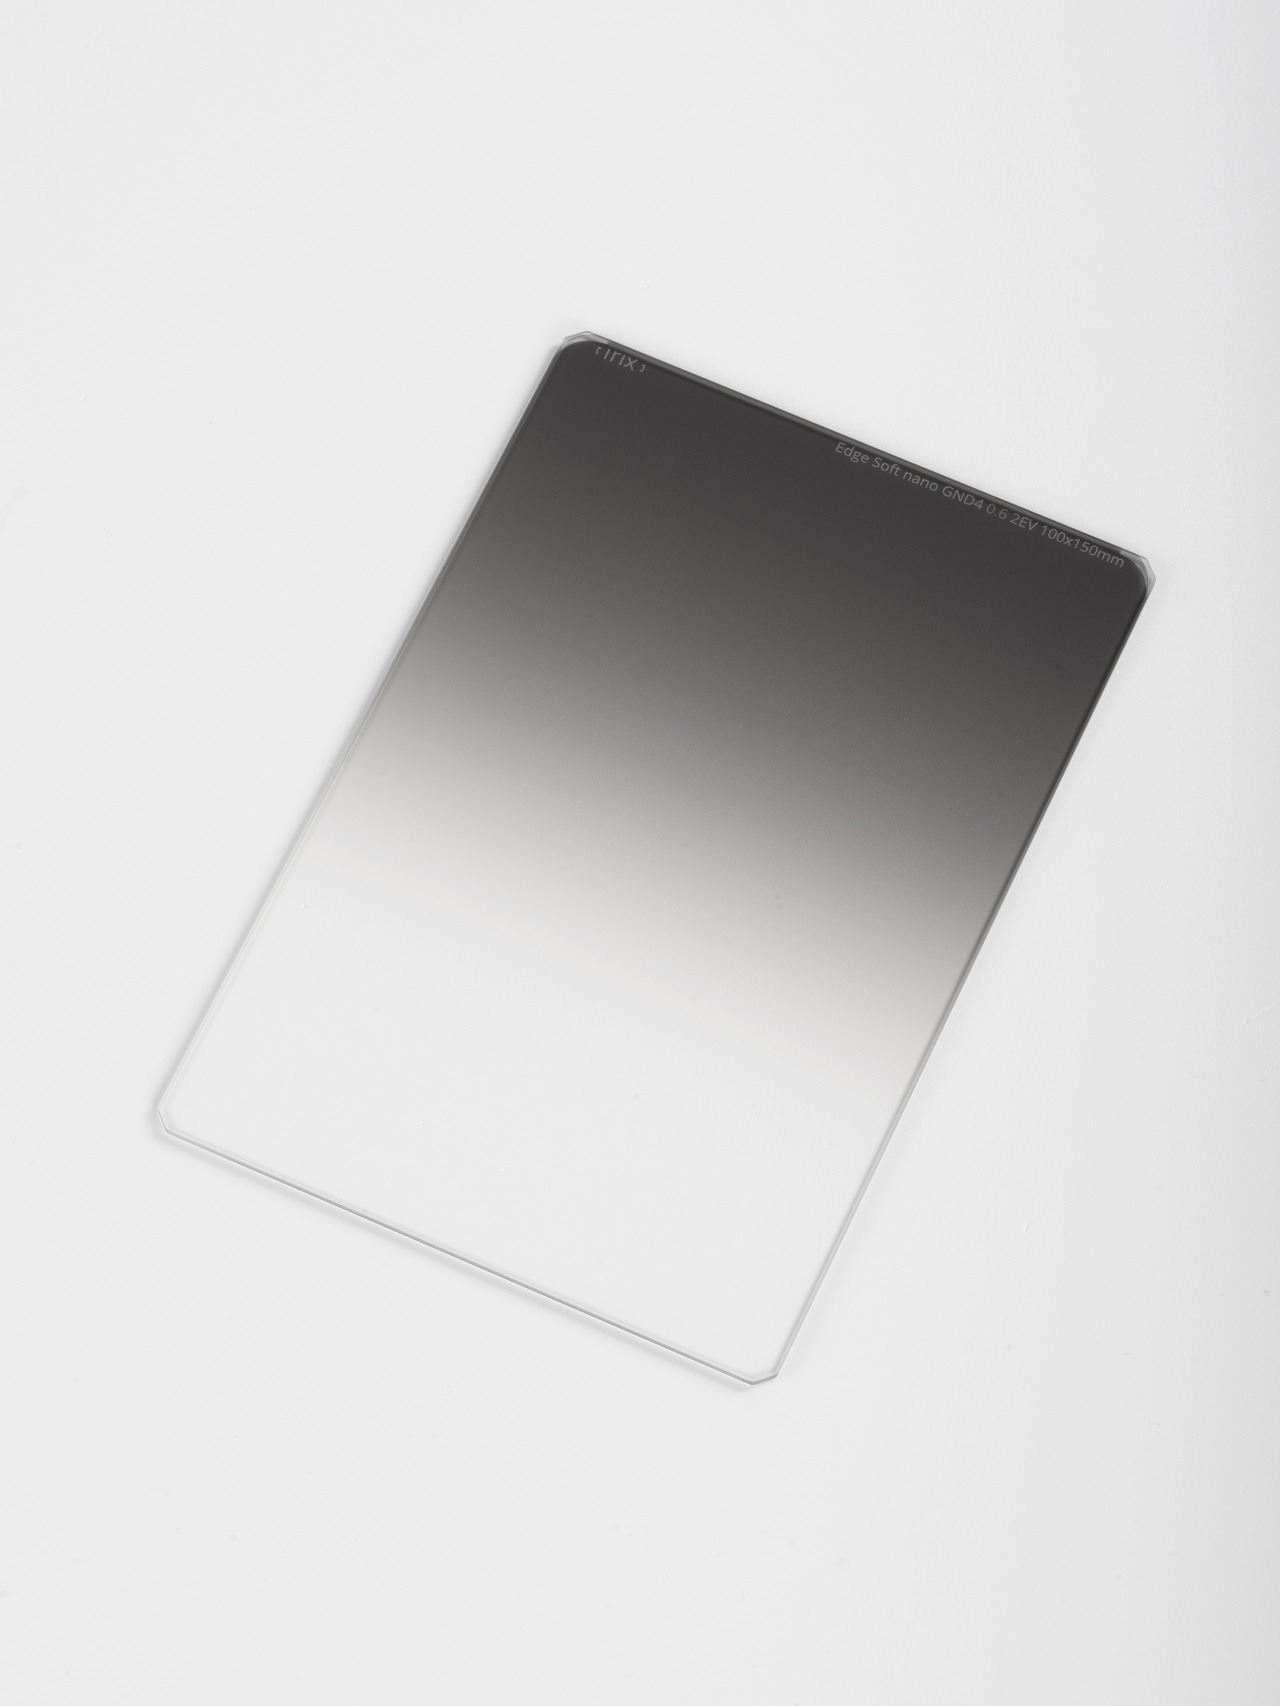
The Irix Edge Soft Gradient Filter is a filter in which the gradient is extended – there is a long transition between full transparency and maximum density (about one third of the filter height). Thanks to this feature, we can obtain a natural tonality of the image when shooting scenes with irregular horizons such as wooded areas and mountainous regions, as well as urban scenes. We should cover the area of the frame with the sky (naturally the brightest part of this) as this obscures the densest part of the filter, while the gradient covers the irregular horizon line.
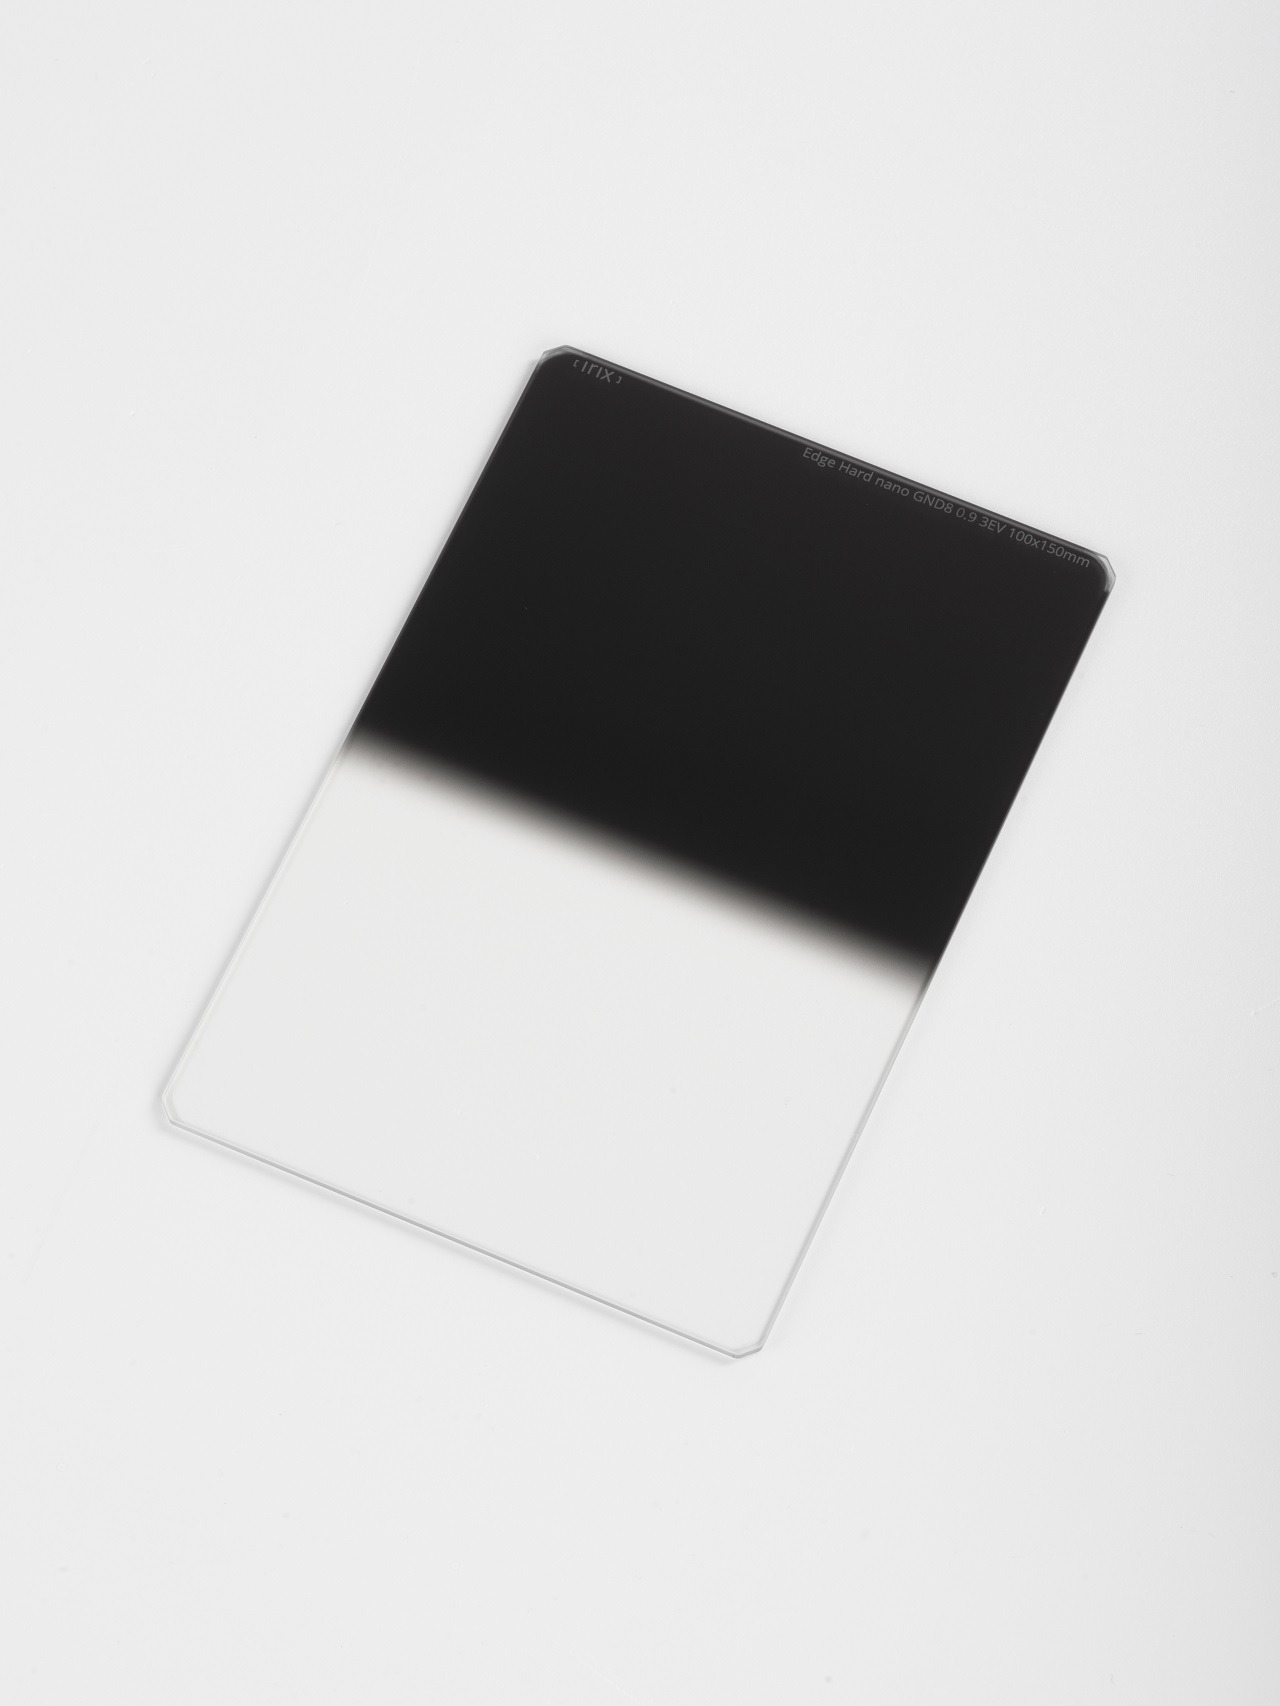
The Irix Edge Hard Gradual Filter is a filter whose transition between full transparency and shaded area is narrow. This type of filter works well for scenes where the horizon is flat and regular, for example by the sea or across a flat plain. In this situation, the upper part of the image (the sky) is definitely brighter than the rest of the frame and this part should be covered with a filter.
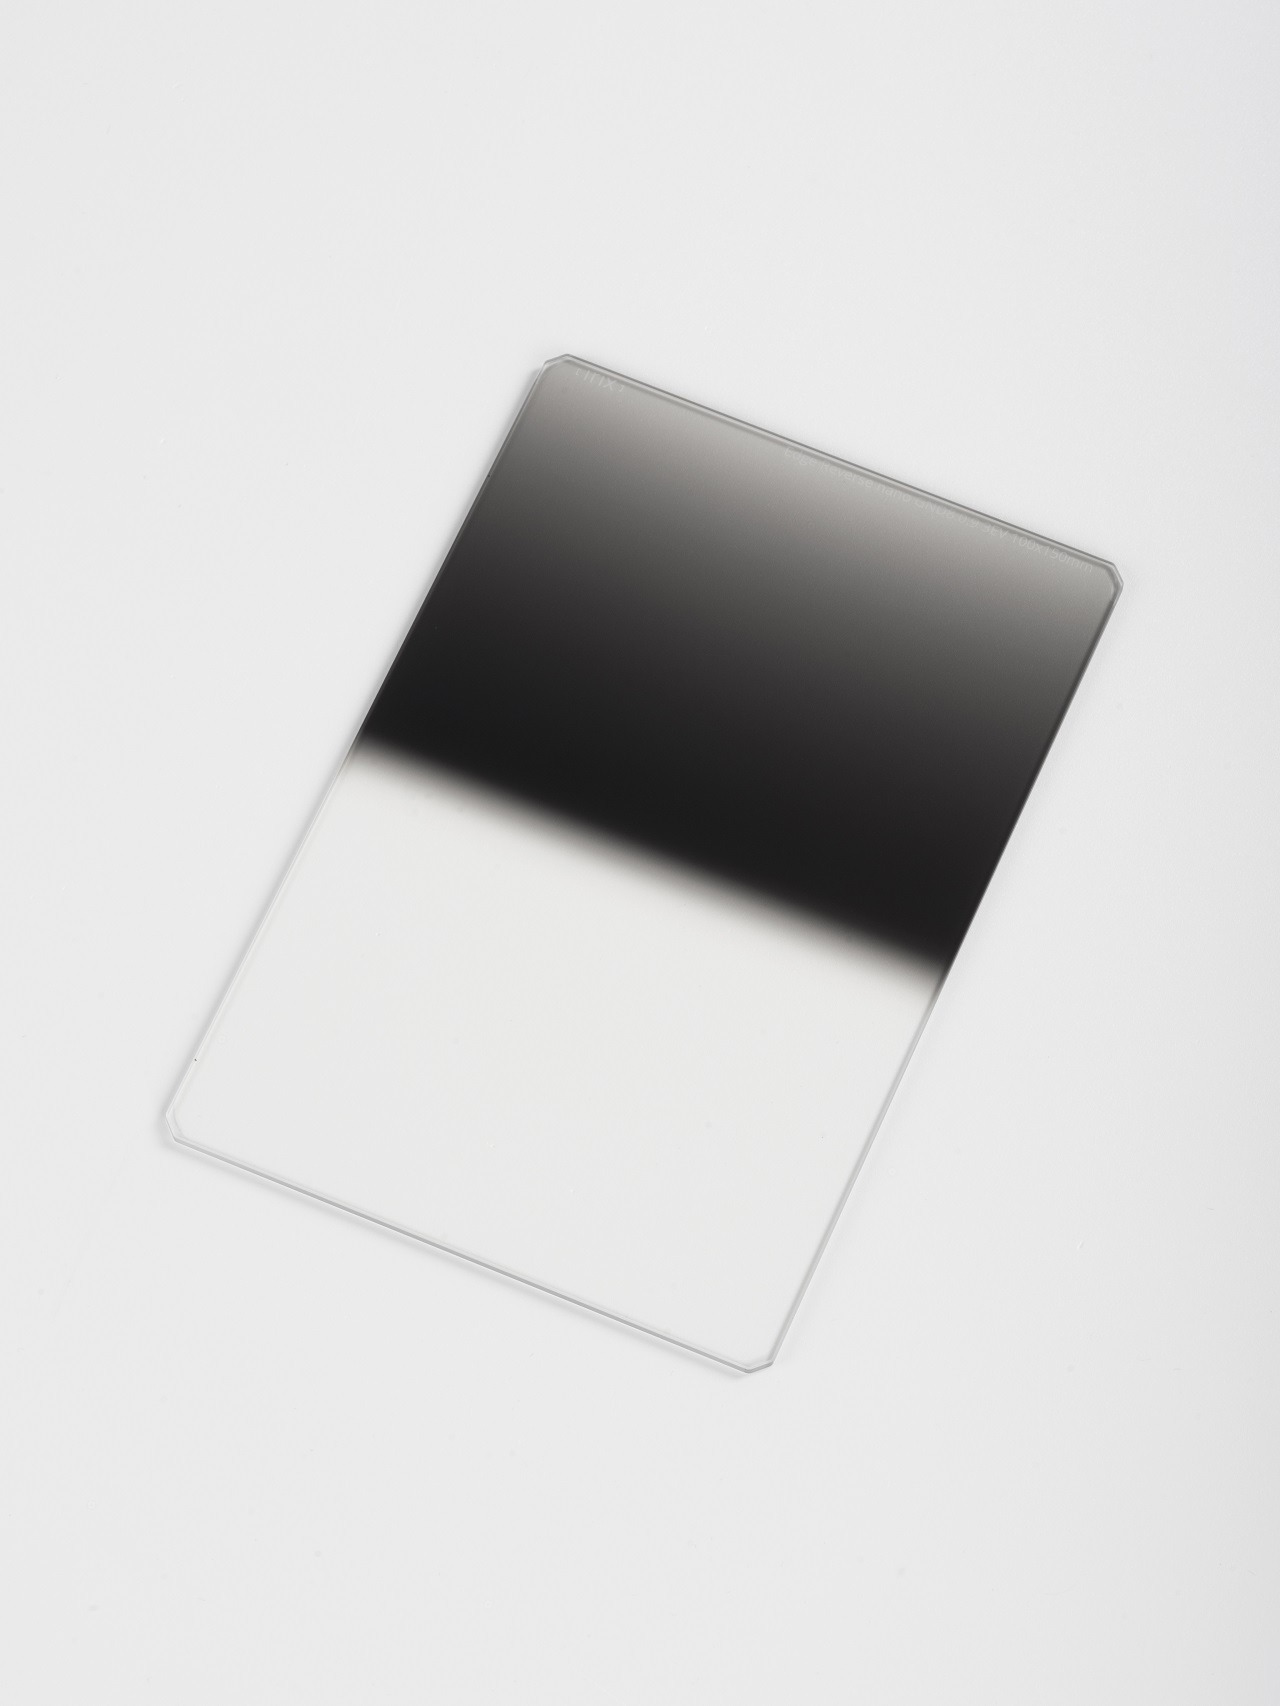
The Irix Edge Reverse Gradual Filter is a relatively new type of filter which combines the features of a hard and soft filter. It finds its application in the field of sunrise and sunset photography. Probably everyone of us has at one time tried their best to capture a beautiful view of the sun emerging from the horizon, and then encountering one problem: either the frame was visible, the sun above the horizon has turned into a white spot, or we’ve managed to capture the sun with a beautiful façade of pastel colours in a background of black emptiness. This filter in its design allows us to eliminate this difficulty – it is half transparent, turning to full density (hard gradual), and then gradually reducing the density (soft gradual). Such a construction ensures that we are covering the narrow spectrum of the frame within the horizon line, thus giving the possibility of a correct exposure of the photograph.
The Irix Edge Full-ND 100×100 is a full grey filter – the entire surface is responsible for the reduction of light.
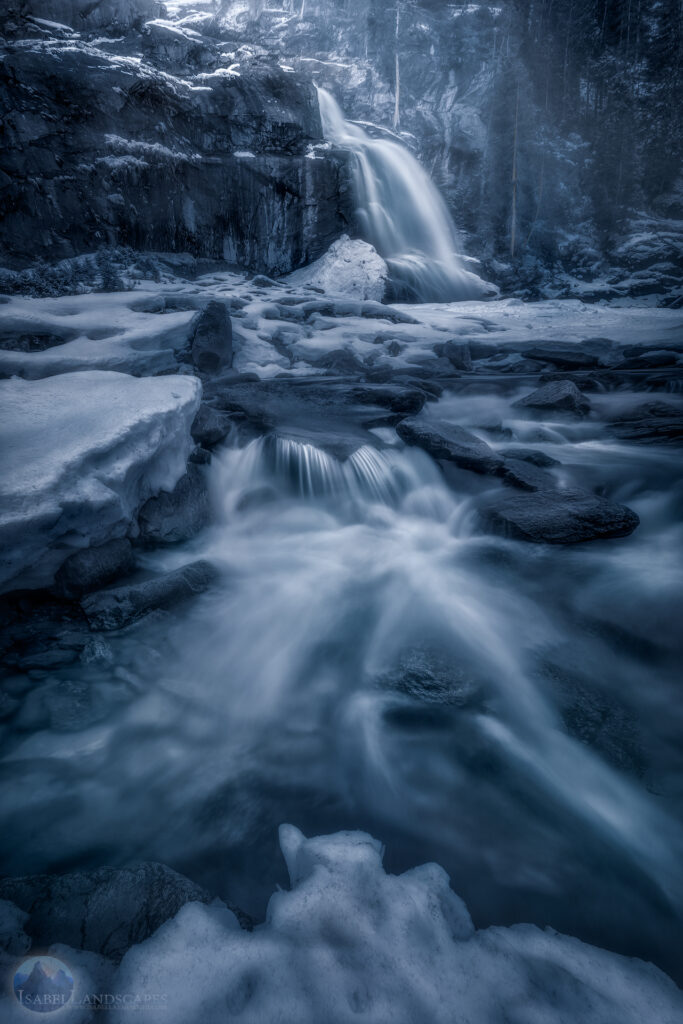
This filter is especially useful when we want to extend the exposure time and not by means of other exposure parameters that are available from the camera or, as previously mentioned, we want to use bright optics on a sunny day and our camera does not allow for a shorter exposure (a shorter shutter speed).
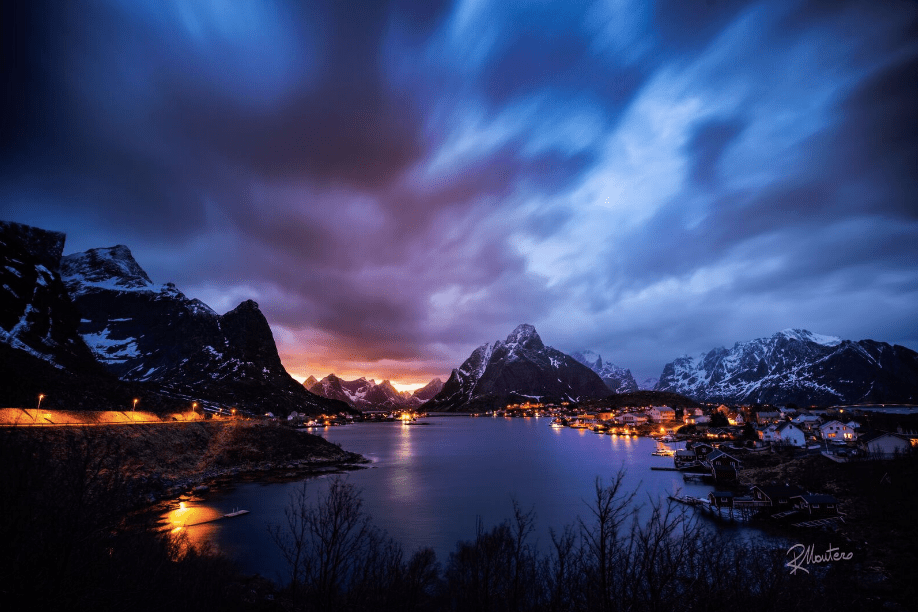
For example, we want to take a picture with a soft water image (motion blur), and we know that our camera has the minimal native (non-programmatically) ISO 100, and the lens is the sharpest when setting the f/4.0-f/8.0 aperture. Optimal settings will include ISO 100, an aperture of f/8.0, and a time depending on insolation (the sun’s radiation) – during the day the shutter speed will usually be from 1/50 to 1/1000. It is definitely too short a time to blur any movement. Therefore, we can choose a filter suitable for our requirements (with the desired density).
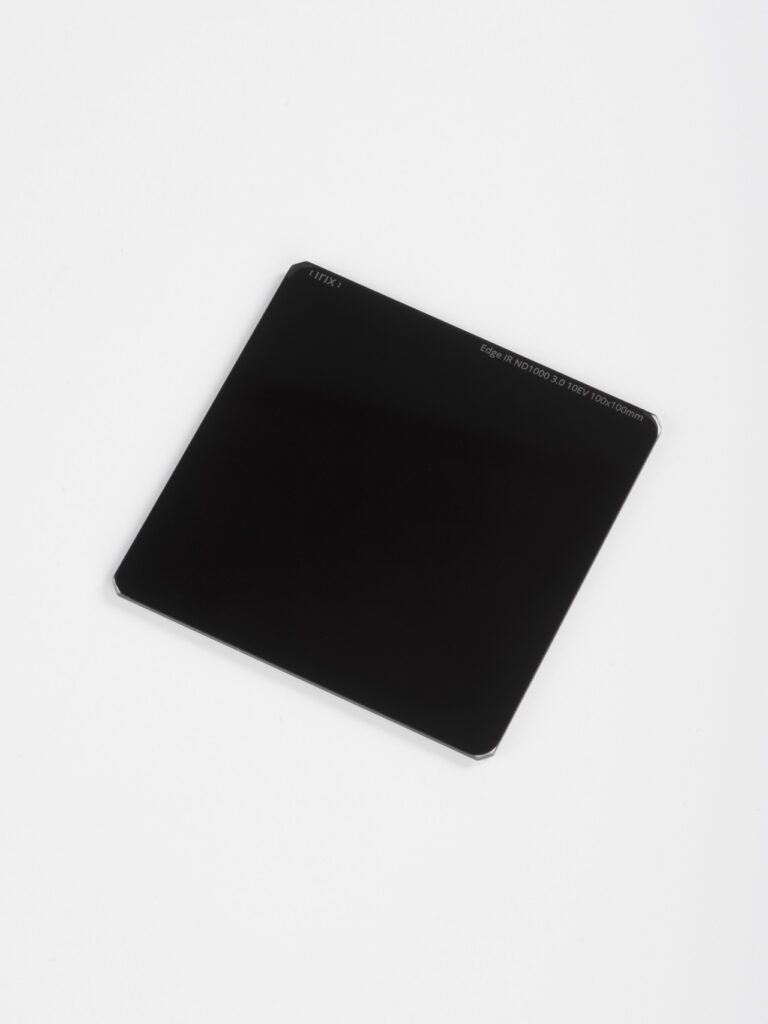
Filter densities. These filters occur in different densities, and are usually densities for gradient filters that range from ND4 (density 0.6 / 2EV) to ND32 (1.5 / 5EV). The situation is different for full ND filters: here, the density range of filters reaches the extreme values, from ND4 to ND1000 (density 3.0 / 10EV) and higher. As a result, each and every photographer is able to choose something for themselves, knowing their needs (and the limitations of their own equipment), as well as the circumstances in which they usually come to photograph.
The mere amount of filters and their density may be of some embarrassment, but after a while we are able to sense what filters are the best answers for our work.
In my case, there are only three of them, but which ones? Well, I’ll keep that particular piece of information for myself.
Irix Edge Filters were used in the compiling of this article.
Author: Piotr Tomala, Irix Brand Manager